How to setup the HAProxy Cluster with high availability
This section shows how to set up a highly available HAProxy load balancer supported by a Floating IP and the Corosync/Pacemaker cluster stack.
Floating IPs are also known as “shared” or “virtual” IP addresses. A Floating IP is a normal IP address assigned to a node that may eventually fail. For failover, a node with similar characteristics (Passive) runs alongside with the main (Active) node in an Active/Passive mode. If a failure occurs, this Floating IP will be assigned to the Passive node automatically and transparently, making it the active one and avoiding downtime.
Each of the HAProxy load balancers will be configured to split traffic between kube-apiserver. If the primary load balancer goes down, the Floating IP will be moved to the second load balancer automatically, allowing it continue serving without downtime.
HAProxy
“HAProxy is a free, very fast and reliable solution offering high availability, load balancing, and proxying for TCP and HTTP-based applications. It is particularly suited for very high traffic web sites and powers quite a number of the world’s most visited ones. Over the years it has become the de-facto standard opensource load balancer, is now shipped with most mainstream Linux distributions, and is often deployed by default in cloud platforms. Since it does not advertise itself, we only know it’s used when the admins report it :-)”
Reference: http://www.haproxy.org/
Full explanation in our Technology Stack.
Corosync
The Corosync Cluster Engine is a Group Communication System with additional features for implementing high availability within applications. The project provides four C Application Programming Interface features:
- A closed process group communication model with extended virtual synchrony guarantees for creating replicated state machines.
- A simple availability manager that restarts the application process when it has failed.
- A configuration and statistics in-memory database that provide the ability to set, retrieve, and receive change notifications of information.
- A quorum system that notifies applications when quorum is achieved or lost.
Full explanation in our Technology Stack.
Pacemaker
Pacemaker is an advanced, scalable high-availability cluster resource manager.
It supports “N-node” clusters with significant capabilities for managing resources and dependencies.
It will run scripts at initialization, when machines go up or down, when related resources fail and can be configured to periodically check resource health.
Full explanation in our Technology Stack.
Resource Agents
Resource Agents are the abstraction that allows Pacemaker to manage services it knows nothing about. They contain the logic for what to do when the cluster wishes to start, stop or check the health of a service.
ocf:heartbeat:IPaddr2
This Linux-specific resource manages IP alias IP addresses. It can add an IP alias, or remove one. In addition, it can implement Cluster Alias IP functionality if invoked as a clone resource.
More info http://linux-ha.org/doc/man-pages/re-ra-IPaddr2.html
ocf:heartbeat:haproxy
Manages haproxy daemon as an OCF resource in an High Availability setup.
More info https://raw.githubusercontent.com/russki/cluster-agents/master/haproxy
Create the VMs
To initialize and configure our instances using cloud-init, we’ll use the configuration files versioned at the data directory from our repository.
Notice we also make use of our create-image.sh helper script, passing some files from inside the data/hapx/ directory as parameters.
-
Create the HAProxy Cluster
~/kubernetes-under-the-hood$ for instance in hapx-node01 hapx-node02; do
    ./create-image.sh \
        -k ~/.ssh/id_rsa.pub \
        -u hapx/user-data \
        -n hapx/network-config \
        -i hapx/post-config-interfaces \
        -r hapx/post-config-resources \
        -o ${instance} \
        -l debian \
        -b debian-base-image
done
Expected output:
Total translation table size: 0
Total rockridge attributes bytes: 417
Total directory bytes: 0
Path table size(bytes): 10
Max brk space used 0
187 extents written (0 MB)
0%...10%...20%...30%...40%...50%...60%...70%...80%...90%...100%
Machine has been successfully cloned as "hapx-node01"
Waiting for VM "hapx-node01" to power on...
VM "hapx-node01" has been successfully started.
Total translation table size: 0
Total rockridge attributes bytes: 417
Total directory bytes: 0
Path table size(bytes): 10
Max brk space used 0
187 extents written (0 MB)
0%...10%...20%...30%...40%...50%...60%...70%...80%...90%...100%
Machine has been successfully cloned as "hapx-node02"
Waiting for VM "hapx-node02" to power on...
VM "hapx-node02" has been successfully started.
Parameters:
-kis used to copy the public key from your host to the newly created VM.-uis used to specify the user-data file that will be passed as a parameter to the command that creates the cloud-init ISO file we mentioned before (check the source code of the script for a better understanding of how it’s used). Default is/data/user-data.-mis used to specify the meta-data file that will be passed as a parameter to the command that creates the cloud-init ISO file we mentioned before (check the source code of the script for a better understanding of how it’s used). Default is/data/meta-data.-nis used to pass a configuration file that will be used by cloud-init to configure the network for the instance.-iis used to pass a configuration file that our script will use to modify the network interface managed by VirtualBox that is attached to the instance that will be created from this image.-ris used to pass a configuration file that our script will use to configure the number of processors and amount of memory that is allocated to our instance by VirtualBox.-ois used to pass the hostname that will be assigned to our instance. This will also be the name used by VirtualBox to reference our instance.-lis used to inform which Linux distribution (debian or ubuntu) configuration files we want to use (notice this is used to specify which folder under data is referenced). Default isdebian.-bis used to specify which base image should be used. This is the image name that was created on VirtualBox when we executed the installation steps from our linux image.-sis used to pass a configuration file that our script will use to configure virtual disks on VirtualBox. You’ll notice this is used only on the Gluster configuration step.-awhether or not our instance should be initialized after it’s created. Default istrue.
Understading the user-data file
The cloud-init HAProxy configuration file can be found here. This sets up a Load Balance for the Kube Master Nodes.
Below you can find the same file commented for easier understanding:
#cloud-config
write_files:

# CA SSH pub certificate
- path: /etc/ssh/ca.pub
  permissions: '0644'
  encoding: b64
  content: |
    c3NoLXJzYSBBQUFBQjNOemFDMXljMkVBQUFBREFRQUJBQUFDQVFERGozaTNSODZvQzNzZ0N3ZVRh
    R1dHZVZHRFpLbFdiOHM4QWVJVE9hOTB3NHl5UndSUWtBTWNGaWFNWGx5OEVOSDd0MHNpM0tFYnRZ
    M1B1ekpTNVMwTHY0MVFkaHlYMHJhUGxobTZpNnVDV3BvYWsycEF6K1ZFazhLbW1kZjdqMm5OTHlG
    Y3NQeVg0b0t0SlQrajh6R2QxWHRBWDBuS0JWOXFkOGNTTFFBZGpQVkdNZGxYdTNCZzdsNml3OHhK
    Ti9ld1l1Qm5DODZ5TlNiWFlDVVpLOE1oQUNLV2FMVWVnOSt0dXNyNTBSbGVRcGI0a2NKRE45LzFa
    MjhneUtORTRCVENYanEyTzVqRE1MRDlDU3hqNXJoNXRPUUlKREFvblIrMnljUlVnZTltc2hIQ05D
    VWU2WG16OFVJUFJ2UVpPNERFaHpHZ2N0cFJnWlhQajRoMGJoeGVMekUxcFROMHI2Q29GMDVpOFB0
    QXd1czl1K0tjUHVoQlgrVm9UbW1JNmRBTStUQkxRUnJ3SUorNnhtM29nWEMwYVpjdkdCVUVTcVll
    QjUyU0xjZEwyNnBKUlBrVjZYQ0Qyc3RleG5uOFREUEdjYnlZelFnaGNlYUYrb0psdWE4UDZDSzV2
    VStkNlBGK2o1aEE2NGdHbDQrWmw0TUNBcXdNcnBySEhpd2E3bzF0MC9JTmdoYlFvUUdSU3haQXMz
    UHdYcklMQ0xUeGN6V29UWHZIWUxuRXRTWW42MVh3SElldWJrTVhJamJBSysreStKWCswcm02aHRN
    N2h2R2QzS0ZvU1N4aDlFY1FONTNXWEhMYXBHQ0o0NGVFU3NqbVgzN1NwWElUYUhEOHJQRXBia0E0
    WWJzaVVoTXZPZ0VCLy9MZ1d0R2kvRVRxalVSUFkvWGRTVTR5dFE9PSBjYUBrdWJlLmRlbW8K

# We want to configure Corosync to use cryptographic techniques to ensure the
# authenticity and privacy of messages, so we generate a private key.
#
#  For more details, read corosync-keygen man page on Linux: $ man 8 corosync-keygen
- path: /etc/corosync/authkey
  permissions: '0400'
  content: !!binary |
    OMTsv6GMyv7yUn2kfWiNA4d7NEudNDUokpxSkL60Czw1AN9t4vs/eOF09nk0STb5yXacjApDAq8J
    smu0y/y2g0uQK9T9euYlZmqVuUJVX8afQ/ZYVVrJaB+JwwocTgjXE6jdXB38g8cqBCRSBxenlQpB
    OGVN8os72UdniJynZa25gsPlSIrSoKNsoz2sgcZUgrDC3WsCjzQfuvK/RabyJjC997RMRUAvCliH
    YnYf3AAFufgTtAxO41APzEg+7bceaxxfSjtv3QdQcLB1O6WoXadX+Ksm1QxfKJX0nz3UA9zKwXCY
    mrUVTP1ilpvwkl1VZXYGOiHZakJC0BiayQhJDg==

# The corosync.conf instructs the Corosync executive about various parameters
# needed to control it.
# Empty lines and lines starting with the '#'
# character are ignored.
#
#  For more details, read corosync.conf man page on Linux: $ man 5 corosync.conf
- path: /etc/corosync/corosync.conf
  permissions: '0644'
  content: |
    totem {
      version: 2
      cluster_name: haproxy-cluster
      token: 3000
      token_retransmits_before_loss_const: 10
      clear_node_high_bit: yes
      crypto_cipher: aes256
      crypto_hash: sha256
      ip_version: ipv4
      interface {
        ringnumber: 0
        bindnetaddr: 192.168.4.128
        mcastaddr: 239.255.1.1
        mcastport: 5405
        ttl: 1
      }
    }

    nodelist {
      node {
        ring0_addr: hapx-node01.kube.demo
        name: hapx-node01
        nodeid: 1
        quorum_votes: 1
      }
      node {
        ring0_addr: hapx-node02.kube.demo
        name: hapx-node02
        nodeid: 2
        quorum_votes: 1
      }
    }

    logging {
      fileline: off
      to_stderr: no
      to_logfile: yes
      logfile: /var/log/corosync/corosync.log
      to_syslog: yes
      syslog_facility: daemon
      debug: off
      timestamp: on
      logger_subsys {
        subsys: QUORUM
        debug: off
      }
    }

    quorum {
      provider: corosync_votequorum
      two_node: 1
      expected_votes: 1
    }

# HAProxy's configuration process involves 3 major sources of parameters :
#
#  - the arguments from the command-line, which always take precedence
#  - the "global" section, which sets process-wide parameters
#  - the proxies sections, which can take the
# form of "defaults", "listen", "frontend" and "backend".
#
# The configuration file syntax consists of lines beginning with a keyword
# referenced in its manual, optionally followed by one or several parameters
# delimited by spaces.
#
# For more details read haproxy.cfg page https://www.haproxy.org/download/1.7/doc/configuration.txt
- path: /etc/haproxy/haproxy.cfg
  permissions: '0644'
  content: |
    global
      log /dev/log local0
      log /dev/log local1 notice
      chroot /var/lib/haproxy
      stats socket /run/haproxy/admin.sock mode 660 level admin
      stats timeout 30s
      user haproxy
      group haproxy
      daemon
      ca-base /etc/ssl/certs
      crt-base /etc/ssl/private
      ssl-default-bind-ciphers ECDH+AESGCM:DH+AESGCM:ECDH+AES256:DH+AES256:ECDH+AES128:DH+AES:RSA+AESGCM:RSA+AES:!aNULL:!MD5:!DSS
      ssl-default-bind-options no-sslv3

    defaults
      log global
      mode http
      option httplog
      option dontlognull
      timeout client 20s
      timeout server 20s
      timeout connect 4s
      default-server init-addr last,libc,none
      errorfile 400 /etc/haproxy/errors/400.http
      errorfile 403 /etc/haproxy/errors/403.http
      errorfile 408 /etc/haproxy/errors/408.http
      errorfile 500 /etc/haproxy/errors/500.http
      errorfile 502 /etc/haproxy/errors/502.http
      errorfile 503 /etc/haproxy/errors/503.http
      errorfile 504 /etc/haproxy/errors/504.http

    resolvers dns
      nameserver dns-01 192.168.4.1:53
      resolve_retries 3
      timeout retry 1s
      hold other 30s
      hold refused 30s
      hold nx 30s
      hold timeout 30s
      hold valid 10s

    frontend kubernetes-apiserver-https
      bind *:6443
      mode tcp
      default_backend kubernetes-master-nodes

    backend kubernetes-master-nodes
      mode tcp
      option tcp-check
      balance roundrobin
        server kube-mast01 kube-mast01:6443 check resolvers dns fall 3 rise 2
        server kube-mast02 kube-mast02:6443 check resolvers dns fall 3 rise 2
        server kube-mast03 kube-mast03:6443 check resolvers dns fall 3 rise 2

    listen stats
      bind *:32700
      stats enable
      stats uri /
      stats hide-version
      stats auth admin:admin

runcmd:
  - [ systemctl, stop, haproxy, pacemaker, corosync ]
  - [ systemctl, disable, haproxy, pacemaker, corosync ]
  - [ curl, -s, "https://raw.githubusercontent.com/russki/cluster-agents/master/haproxy", -o, /usr/lib/ocf/resource.d/heartbeat/haproxy ]
  - [ chmod, "0755", /usr/lib/ocf/resource.d/heartbeat/haproxy ]
  - [ systemctl, restart, pacemaker, corosync ]
  - [ systemctl, enable, pacemaker, corosync ]
  - [ chown, -R, 'debian:debian', '/home/debian' ]
  # SSH server to trust the CA
  - echo '\nTrustedUserCAKeys /etc/ssh/ca.pub' | tee -a /etc/ssh/sshd_config

apt:
  sources_list: |
    deb http://deb.debian.org/debian/ $RELEASE main contrib non-free
    deb-src http://deb.debian.org/debian/ $RELEASE main contrib non-free

    deb http://deb.debian.org/debian/ $RELEASE-updates main contrib non-free
    deb-src http://deb.debian.org/debian/ $RELEASE-updates main contrib non-free

    deb http://deb.debian.org/debian-security $RELEASE/updates main
    deb-src http://deb.debian.org/debian-security $RELEASE/updates main
  conf: |
    APT {
      Get {
        Assume-Yes "true";
        Fix-Broken "true";
      };
    };

packages:
  - pacemaker
  - corosync
  - crmsh
  - haproxy
  - curl

users:
- name: debian
  gecos: Debian User
  sudo: ALL=(ALL) NOPASSWD:ALL
  shell: /bin/bash
  lock_passwd: true
- name: root
  lock_passwd: true

locale: en_US.UTF-8

timezone: UTC

ssh_deletekeys: 1

package_upgrade: true

ssh_pwauth: false

manage_etc_hosts: false

fqdn: #HOSTNAME#.kube.demo

hostname: #HOSTNAME#

power_state:
  mode: reboot
  timeout: 30
  condition: true
Configure your local routing
You need to add a route to your local machine to access the Virtualbox internal network.
~$ sudo ip route add 192.168.4.0/27 via 192.168.4.30 dev vboxnet0
~$ sudo ip route add 192.168.4.32/27 via 192.168.4.62 dev vboxnet0
Access the BusyBox
We need to get the BusyBox IP to access it via ssh:
~$ vboxmanage guestproperty get busybox "/VirtualBox/GuestInfo/Net/0/V4/IP"
Expected output:
Value: 192.168.4.57
Use the returned value to access to ssh into the VM:
~$ ssh debian@192.168.4.57
Expected output:
Linux busybox 6.1.0-42-amd64 #1 SMP PREEMPT_DYNAMIC Debian 6.1.159-1 (2025-12-30) x86_64

The programs included with the Debian GNU/Linux system are free software;
the exact distribution terms for each program are described in the
individual files in /usr/share/doc/*/copyright.

Debian GNU/Linux comes with ABSOLUTELY NO WARRANTY, to the extent
permitted by applicable law.
Access the HAProxy Node
After having accessed the BusyBox and being inside a ssh session, just access the instances by name, in our case we want to access hapx-node01.
debian@busybox:~$ ssh hapx-node01
Configure Pacemaker
Before carrying out with the Pacemaker configuration, it is worth making some observations.
-
Let’s check IP configuration, using
ip addr:debian@hapx-node01:~$ ip addr show enp0s3.41 3: enp0s3.41@enp0s3: <BROADCAST,MULTICAST,UP,LOWER_UP> mtu 1500 qdisc noqueue state UP group default qlen 1000 link/ether 08:00:27:a4:ce:07 brd ff:ff:ff:ff:ff:ff inet6 fe80::a00:27ff:fea4:ce07/64 scope link valid_lft forever preferred_lft foreverAs you can see, we still don’t have our cluster’s IP (
192.168.4.20) configured on any of the network interfaces. -
Let’s check Pacemaker configuration, using
crm statusdebian@hapx-node01:~$ sudo crm status Stack: corosync Current DC: hapx-node02 (version 1.1.16-94ff4df) - partition with quorum Last updated: Sun Feb 2 19:53:25 2020 Last change: Sun Feb 2 19:51:43 2020 by hacluster via crmd on hapx-node02 2 nodes configured 0 resources configured Online: [ hapx-node01 hapx-node02 ] No resourcesHere we notice that we have only two active and configured nodes (
hapx-node01andhapx-node02), but no resources that will make up our cluster (virtual-ip-resourceandhaproxy-resource). -
Let’s configure resources on Pacemaker using
crm configureHere we define our Virtual IP as
192.168.4.20. This will be the IP address of our K8S cluster (Control Plane EndPoint).At this point, we will configure the features of our HAProxy Cluster using the crmsh tool. crmsh is a cluster management shell for the Pacemaker High Availability stack.
The following step can be run on any node, because right now Corosync should keep the Cluster Configuration in sync.
Note: each line below represents a command that should be entered separately in the command line.
debian@hapx-node01:~$ cat <<EOF | sudo crm configure
property startup-fencing=false
property stonith-enabled=false
property no-quorum-policy=ignore
rsc_defaults resource-stickiness=100
primitive virtual-ip-resource ocf:heartbeat:IPaddr2 params ip="192.168.4.20" broadcast=192.168.4.31 nic=enp0s3.41 cidr_netmask=27 meta migration-threshold=2 op monitor interval=20 timeout=60 on-fail=restart
primitive haproxy-resource ocf:heartbeat:haproxy op monitor interval=20 timeout=60 on-fail=restart
colocation loc inf: virtual-ip-resource haproxy-resource
order ord Mandatory: virtual-ip-resource haproxy-resource
commit
quit
EOF
Pacemaker parameters explained:
-
property stonith-enabled=noSTONITHhas the function of protecting your data against corruption and the application to get unavailable, due to simultaneous unintentional access by several nodes. For example, just because a node does not respond, does not mean that it has stopped accessing its data. The only way to be 100% sure that your data is secure is to ensure that the node is actually offline before allowing the data to be accessed by another node.
STONITHalso plays a role in the event that a service cannot be stopped. In this case, the cluster usesSTONITHto force the node to go offline, making it safe to start the service elsewhere.
STONITHis an acronym for “Shoot The Other Node In The Head”, and is the most popular data protection mechanism.
To ensure the integrity of your data,STONITHis activated by default.In our case, as we do not access data such as databases nor files, it does not make sense to keep
STONITHactive. For this reason, we set it tostonith-enabled=no -
property no-quorum-policy=ignoreThe
no-quorum-policyparameter determines how the cluster behaves when there aren’t enough nodes to compose it. To avoid a split-brain scenario, the cluster will only respond if quorum is achieved. To illustrate, imagine a cluster with five nodes, where, due to a network failure, two separate groups are created: one group with three nodes, and another group with two nodes. In this scenario, only the group with three nodes is able to achieve a majority of votes. Thus, only the group with three nodes can make use of cluster resources. This configuration is very important, because there would be a risk of resources corruption if the group with only two nodes was also able to use them. The default value for theno-quorum-policyparameter isstop.We only have two nodes in our example. Thus, if one of they got offline for any reason, our whole cluster would be taken down due to lack of quorum (>50%). To avoid this situation, we configure our policy to
ignoreand nothing else needs to be done. In a production scenario, it would be a good idea to have at least 3 nodes to ensure higher availability though. -
rsc_defaults resource-stickiness=100The
resource-stickinessdetermines where the cluster resources will be allocated. The default behavior is to get the resources back to the original nodes where they were allocated. This means that, after a failure, the resource will be allocated in another node from the cluster and, when the original node is back to a healthy state, the resource is moved back to it. This is not ideal, because the users will be exposed to a inconsistent scenario twice. To avoid this situation, you can set a weight (between -1.000.000 and 1.000.000) to theresource-stickinessparameter: a0means the resource will be moved back to its original node; a positive value tells the resource should be kept where it is.In our case, we arbitrarily set it to
100. -
primitive virtual-ip-resource ocf:heartbeat:IPaddr2 params ip="192.168.4.20" broadcast=192.168.4.31 nic=enp0s3.41 cidr_netmask=27 meta migration-threshold=2 op monitor interval=20 timeout=60 on-fail=restart-
primitive- Represents a resource that should exist as a single instance in the whole cluster. An IP, for example, can be configured as a primitive resource and there should be only one instance of this resource in the cluster at any given time.-
virtual-ip-resource- A unique name we give to our resource. -
ocf:heartbeat:IPaddr2- The OCF cluster resource agent.
-
-
meta migration-threshold- When a resource is created, you can configure it to be moved to a different node after a given number of failures happen. This parameter serves this purpose. After the limit is reached, the current node won’t be able to own the resource until one of the following happens-
An administrator resets the resource’s
failcountvalue. -
The resource’s
failure-timeoutvalue is reached.
The default value for the
migration-thresholdisINFINITY. Internally, this is defined as a very high, but finite value. Setting this to 0 disables the threshold behavior for the given resource. -
-
params- Parameters for resource agent:-
ip- The IPv4 address to be configured in dotted quad notation, for example “192.168.1.1”. (required, string, no default) -
nic- The base network interface on which the IP address will be brought online. If left empty, the script will try and determine this from the routing table. Do NOT specify an alias interface in the formeth0:1or anything here; rather, specify the base interface only. Prerequisite: There must be at least one static IP address, which is not managed by the cluster, assigned to the network interface. If you can not assign any static IP address on the interface, modify this kernel parameter:sysctl -w net.ipv4.conf.all.promote_secondaries=1(or per device). (optional, string, default eth0) -
cidr_netmask- The netmask for the interface in CIDR format (e.g., 24 and not 255.255.255.0). If unspecified, the script will also try to determine this from the routing table. (optional, string, no default) -
broadcast- Broadcast address associated with the IP. If left empty, the script will determine this from the netmask. (optional, string, no default)
-
-
op- Configure monitoring operation:-
monitor- The action to perform. Common values:monitor,start,stop -
interval- If set to a nonzero value, a recurring operation is created that repeats at this frequency, in seconds. A nonzero value makes sense only when the action name is set to monitor. A recurring monitor action will be executed immediately after a resource start completes, and subsequent monitor actions are scheduled starting at the time the previous monitor action completed. For example, if a monitor action withinterval=20sis executed at 01:00:00, the next monitor action does not occur at 01:00:20, but at 20 seconds after the first monitor action completes.If set to zero, which is the default value, this parameter allows you to provide values to be used for operations created by the cluster. For example, if the interval is set to zero, the name of the operation is set to start, and the timeout value is set to 40, then Pacemaker will use a timeout of 40 seconds when starting this resource. A monitor operation with a zero interval allows you to set the timeout/on-fail/enabled values for the probes that Pacemaker does at startup to get the current status of all resources when the defaults are not desirable.
-
timeout- If the operation does not complete in the amount of time set by this parameter, it’s aborted and considered as failed. The default value is the value of timeout if set with the pcs resource op defaults command, or 20 seconds if it is not set. If you find that your system includes a resource that requires more time than the system allows to perform an operation (such as start, stop, or monitor), investigate the cause and, if the lengthy execution time is expected, you can increase this value.The timeout value is not a delay of any kind, nor does the cluster wait the entire timeout period if the operation returns before the timeout period has completed.
-
on-fail- The action to take if this action ever fails.Allowed values:
ignore- Pretend the resource did not fail.block- Do not perform any further operations on the resource.stop- Stop the resource and do not start it elsewhere.restart- Stop the resource and start it again (possibly on a different node).fence- STONITH the node on which the resource failed.standby- Move all resources away from the node on which the resource failed.
Reference: http://www.linux-ha.org/doc/man-pages/re-ra-IPaddr2.html
Reference: https://access.redhat.com/documentation/en-us/red_hat_enterprise_linux/7/html/high_availability_add-on_reference/s1-resourceoperate-haar -
-
primitive haproxy-resource ocf:heartbeat:haproxy op monitor interval=20 timeout=60 on-fail=restartssh debian@gate-node01-
colocation loc inf: virtual-ip-resource haproxy-resourcecolocationrestrictions allow you to tell the cluster how resources depend on each other. It has an important side-effect: it affects the order in which the resources are assigned to a node.Think a bit about it: the cluster can’t colocate
AwithB, unless it knows whereBis located. For this reason, when creatingcolocationrestrictions, it’s really important to think ifAneeds to be colocated withBor ifBneeds to be colocated withA.In our case, since the
haproxy-resourceshould be colocated with thevirtual-ip-resource, thehaproxy-resourcewill be allocated on the same node where thevirtual-ip-resourceis. -
order ord Mandatory: virtual-ip-resource haproxy-resourceThe
orderconstraints tell the cluster the order in which resources should be allocated. In this case, we are informing that thevirtual-ip-resourceshould always be allocated before thehaproxy-resource.Ordering constraints affect only the ordering in which resources are created. They do not cause the resources be colocated on the same node.
Let’s check our IP configuration one more time, using
ip addr:debian@hapx-node01:~$ ip addr show enp0s3.41 3: enp0s3.41@enp0s3: <BROADCAST,MULTICAST,UP,LOWERssh debian@gate-node01_UP> mtu 1500 qdisc noqueue state UP group default qlen 1000 link/ether 08:00:27:a4:ce:07 brd ff:ff:ff:ff:ff:ff inet 192.168.4.20/27 brd 192.168.4.31 scope global enp0s3.41 valid_lft forever preferred_lft forever inet6 fe80::a00:27ff:fea4:ce07/64 scope link valid_lft forever preferred_lft foreverVoilá! Now our cluster’s IP is properly configured and managed in the
enp0s3.41interface. -
-
Let’s get some more information from our cluster, using
crm status:debian@hapx-node01:~$ sudo crm status Stack: corosync Current DC: hapx-node01 (version 1.1.16-94ff4df) - partition with quorum Last updated: Sun Feb 2 19:19:16 2020 Last change: Sun Feb 2 19:04:37 2020 by root via cibadmin on hapx-node01 2 nodes configured 2 resources configured Online: [ hapx-node01 hapx-node02 ] Full list of resources: virtual-ip-resource (ocf::heartbeat:IPaddr2): Started hapx-node01 haproxy-resource (ocf::heartbeat:haproxy): Started hapx-node01Here we can see that both nodes and resources are active and configured.
Looking closer, we can see that the
hapx-node01node is the one that has these two resources (virtual-ip-resourceandhaproxy-resource) allocated. That makes perfect sense, as we configured these resources to be always allocated on the same node.
View HAProxy stats page
Now that everything is set up, you can access the HAProxy stats through the Virtual IP we just configured.
Open your browser at http://192.168.4.20:32700
User: admin
Password: admin
It will show:
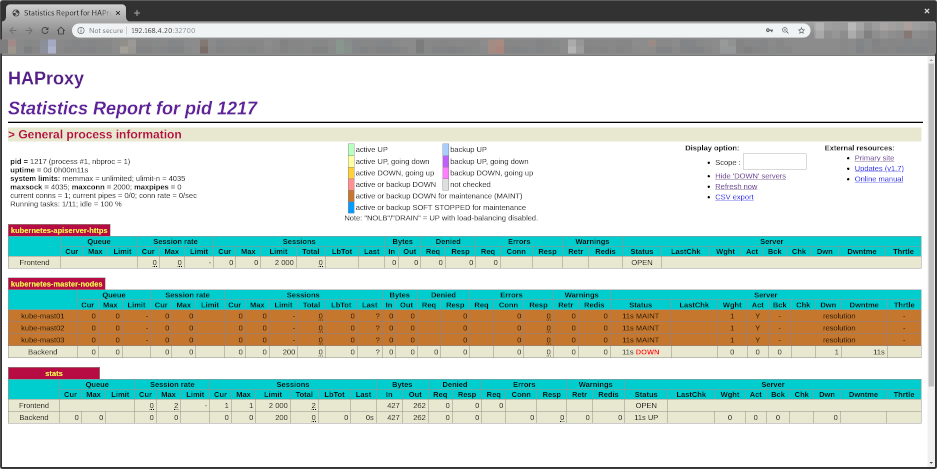
Notice all Control Plane EndPoints are DOWN
- kube-mast01:6443
- kube-mast02:6443
- kube-mast03:6443
This will be fixed once we setup our Kubernetes Master nodes.
Test High Availability
Shutdown one of the two VMs (hapx-node01 or hapx-node02) and press F5 in the browser where you have opened the HAProxy statistics. No difference or error should be noticed. :)
Conclusion
We got deep into configuring an HAProxy Cluster with high availability supported by Corosync and Pacemaker. We configured each of the components individually and also configured an Elastic IP that allows the HAProxy Cluster to failover transparently when any of its nodes fail.
I hope you had fun configuring your cluster and learned some nice useful stuff along the way.