How to setup the Masters using kubeadm bootstrap with external etcd
Master components provide the cluster’s control plane. Master components make global decisions about the cluster (for example, scheduling), and detecting and responding to cluster events (starting up a new pod when a replication controller’s ‘replicas’ field is unsatisfied).
Overview
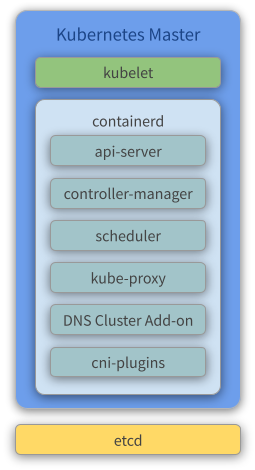
Components
- Kubelet - Kubelet gets the configuration of a pod from the API Server and ensures that the described containers are up and running.
- containerd - Takes care of downloading the images and starting the containers.
- API Server - Validates and configures data for the API objects, which include pods, services, replication controllers, and others. The API Server services REST operations and provides the frontend to the cluster’s shared state through which all other components interact.
- Controller Manager - Watches the state of the cluster through the API Server watch feature and, when notified, makes the necessary changes to the cluster, attempting to move the current state towards the desired state.
- Scheduler - Watches for unscheduled pods and binds them to nodes via the binding pod subresource API, according to the availability of the requested resources, quality of service requirements, affinity and anti-affinity specifications, and other constraints. Once the pod has a node assigned, the regular behavior of the Kubelet is triggered and the pod and its containers are created.
- Kube Proxy - Acts as a network proxy and a load balancer for a service on a single worker node. It takes care of the network routing for TCP and UDP packets.
- Flannel - A layer 3 network fabric designed for Kubernetes. Check our previous topic about flannel for more information.
- CoreDNS - The DNS Server of the Kubernetes cluster. For more information, check the CoreDNS official repository.
Create the VMs
To initialize and configure our instances using cloud-init, we’ll use the configuration files versioned at the data directory from our repository.
Notice we also make use of our create-image.sh helper script, passing some files from inside the data/kube/ directory as parameters.
-
Create the Masters
~/kubernetes-under-the-hood$ for instance in kube-mast01 kube-mast02 kube-mast03; do
    ./create-image.sh \
        -k ~/.ssh/id_rsa.pub \
        -u kube/user-data \
        -n kube-mast/network-config \
        -i kube-mast/post-config-interfaces \
        -r kube-mast/post-config-resources \
        -o ${instance} \
        -l debian \
        -b debian-base-image
done
Expected output:
Total translation table size: 0
Total rockridge attributes bytes: 417
Total directory bytes: 0
Path table size(bytes): 10
Max brk space used 0
186 extents written (0 MB)
0%...10%...20%...30%...40%...50%...60%...70%...80%...90%...100%
Machine has been successfully cloned as "kube-mast01"
Waiting for VM "kube-mast01" to power on...
VM "kube-mast01" has been successfully started.
Total translation table size: 0
Total rockridge attributes bytes: 417
Total directory bytes: 0
Path table size(bytes): 10
Max brk space used 0
186 extents written (0 MB)
0%...10%...20%...30%...40%...50%...60%...70%...80%...90%...100%
Machine has been successfully cloned as "kube-mast02"
Waiting for VM "kube-mast02" to power on...
VM "kube-mast02" has been successfully started.
Total translation table size: 0
Total rockridge attributes bytes: 417
Total directory bytes: 0
Path table size(bytes): 10
Max brk space used 0
186 extents written (0 MB)
0%...10%...20%...30%...40%...50%...60%...70%...80%...90%...100%
Machine has been successfully cloned as "kube-mast03"
Waiting for VM "kube-mast03" to power on...
VM "kube-mast03" has been successfully started.
Parameters:
-kis used to copy the public key from your host to the newly created VM.-uis used to specify the user-data file that will be passed as a parameter to the command that creates the cloud-init ISO file we mentioned before (check the source code of the script for a better understanding of how it’s used). Default is/data/user-data.-mis used to specify the meta-data file that will be passed as a parameter to the command that creates the cloud-init ISO file we mentioned before (check the source code of the script for a better understanding of how it’s used). Default is/data/meta-data.-nis used to pass a configuration file that will be used by cloud-init to configure the network for the instance.-iis used to pass a configuration file that our script will use to modify the network interface managed by VirtualBox that is attached to the instance that will be created from this image.-ris used to pass a configuration file that our script will use to configure the number of processors and amount of memory that is allocated to our instance by VirtualBox.-ois used to pass the hostname that will be assigned to our instance. This will also be the name used by VirtualBox to reference our instance.-lis used to inform which Linux distribution (debian or ubuntu) configuration files we want to use (notice this is used to specify which folder under data is referenced). Default isdebian.-bis used to specify which base image should be used. This is the image name that was created on VirtualBox when we executed the installation steps from our linux image.-sis used to pass a configuration file that our script will use to configure virtual disks on VirtualBox. You’ll notice this is used only on the Gluster configuration step.-awhether or not our instance should be initialized after it’s created. Default istrue.
Understading the user-data file
The cloud-init kube-master configuration file can be found here. This configures and installs Docker and Kubernetes binaries (kubeadm, kubectl, kublet).
Below you can find the same file commented for a better understanding:
#cloud-config
write_files:

# CA ssh pub certificate
- path: /etc/ssh/sshd_config
  permissions: '0644'
  content: |
    TrustedUserCAKeys /etc/ssh/ca.pub
  append: true

# CA ssh pub certificate
- path: /etc/ssh/ca.pub
  permissions: '0644'
  encoding: b64
  content: |
    c3NoLWVkMjU1MTkgQUFBQUMzTnphQzFsWkRJMU5URTVBQUFBSUZWTW1rTnRuRmZDaXRjcFFlWnFR
    dVZQK0NKV1JtWGp3aGlRakoyalJxaS8gY2FAa3ViZS5kZW1vCg==

  # The bridge-netfilter code enables the following functionality:
  #  - {Ip,Ip6,Arp}tables can filter bridged IPv4/IPv6/ARP packets, even when
  # encapsulated in an 802.1Q VLAN or PPPoE header. This enables the functionality
  # of a stateful transparent firewall.
  #  - All filtering, logging and NAT features of the 3 tools can therefore be used
  # on bridged frames.
  #  - Combined with ebtables, the bridge-nf code therefore makes Linux a very
  # powerful transparent firewall.
  #  - This enables, f.e., the creation of a transparent masquerading machine (i.e.
  # all local hosts think they are directly connected to the Internet).
  #
  # The OverlayFS is a union mount filesystem implementation for Linux. It combines
  # multiple different underlying mount points into one, resulting in single
  # directory structure that contains underlying files and sub-directories from all
  # sources.
- path: /etc/modules-load.d/containerd.conf
  permissions: '0644'
  content: |
    overlay
    br_netfilter

  # Besides providing the NetworkPlugin interface to configure and clean up pod networking,
  # the plugin may also need specific support for kube-proxy. The iptables proxy obviously
  # depends on iptables, and the plugin may need to ensure that container traffic is made
  # available to iptables. For example, if the plugin connects containers to a Linux bridge,
  # the plugin must set the net/bridge/bridge-nf-call-iptables sysctl to 1 to ensure that
  # the iptables proxy functions correctly. If the plugin does not use a Linux bridge
  # (but instead something like Open vSwitch or some other mechanism) it should ensure
  # container traffic is appropriately routed for the proxy.
  #
  # For more details : https://kubernetes.io/docs/concepts/extend-kubernetes/compute-storage-net/network-plugins/#network-plugin-requirements
  #
  # As a requirement for your Linux Node’s iptables to correctly see bridged traffic
- path: /etc/sysctl.d/10-kubernetes.conf
  permissions: '0644'
  content: |
    net.ipv4.ip_forward=1
    net.bridge.bridge-nf-call-iptables=1
    net.bridge.bridge-nf-call-arptables=1

- path: /etc/crictl.yaml
  permissions: '0644'
  content: |
    runtime-endpoint: unix:///var/run/containerd/containerd.sock
    timeout: 0
    debug: false

- path: /etc/cni/net.d/net-conf.json
  permission: '0644'
  content: |
    {
      "cniVersion": "0.3.1"
      "Network": "10.244.0.0/16",
      "Backend": {
        "Type": "vxlan"
      }
    }

- path: /etc/cni/net.d/loopback-conf.json
  permission: '0644'
  content: |
    {
      "cniVersion": "0.3.1",
      "name": "lo",
      "type": "loopback"
    }

- path: /usr/local/lib/systemd/system/containerd.service
  permissions: '0644'
  content: |
    [Unit]
    Description=containerd container runtime
    Documentation=https://containerd.io
    After=network.target dbus.service

    [Service]
    ExecStartPre=-/sbin/modprobe overlay
    ExecStart=/usr/local/bin/containerd

    Type=notify
    Delegate=yes
    KillMode=process
    Restart=always
    RestartSec=5

    # Having non-zero Limit*s causes performance problems due to accounting overhead
    # in the kernel. We recommend using cgroups to do container-local accounting.
    LimitNPROC=infinity
    LimitCORE=infinity

    # Comment TasksMax if your systemd version does not supports it.
    # Only systemd 226 and above support this version.
    TasksMax=infinity
    OOMScoreAdjust=-999

    [Install]
    WantedBy=multi-user.target

apt:
  sources_list: |
    deb http://deb.debian.org/debian/ $RELEASE main contrib non-free non-free-firmware
    deb-src http://deb.debian.org/debian/ $RELEASE main contrib non-free non-free-firmware

    deb http://deb.debian.org/debian/ $RELEASE-updates main contrib non-free non-free-firmware
    deb-src http://deb.debian.org/debian/ $RELEASE-updates main contrib non-free non-free-firmware

    deb http://deb.debian.org/debian-security $RELEASE-security main
    deb-src http://deb.debian.org/debian-security $RELEASE-security main

  sources:
    kubernetes.list:
      source: deb [signed-by=/etc/apt/keyrings/kubernetes-apt-keyring.gpg] https://pkgs.k8s.io/core:/stable:/v1.29/deb/ /

  conf: |
    APT {
      Get {
        Assume-Yes "true";
        Fix-Broken "true";
      };
    };

packages:
  - apt-transport-https
  - ca-certificates
  - gnupg2
  - software-properties-common
  - bridge-utils
  - curl
  - gnupg

runcmd:
  - [ modprobe, overlay]
  - [ modprobe, br_netfilter ]
  - [ sysctl, --system ]
  - [ sh, -c, 'curl -fsSL https://pkgs.k8s.io/core:/stable:/v1.29/deb/Release.key | sudo gpg --dearmor -o /etc/apt/keyrings/kubernetes-apt-keyring.gpg' ]
  - [ sh, -c, 'curl -fsSL https://github.com/containerd/containerd/releases/download/v2.2.1/containerd-2.2.1-linux-amd64.tar.gz | tar -xz -C /usr/local' ]
  - [ sh, -c, 'curl -fsSL https://github.com/opencontainers/runc/releases/download/v1.4.0/runc.amd64 -o /usr/local/sbin/runc && chmod 755 /usr/local/sbin/runc' ]
  - [ sh, -c, 'curl -fsSL https://github.com/containernetworking/plugins/releases/download/v1.9.0/cni-plugins-linux-amd64-v1.9.0.tgz | tar -xz -C /opt/cni/bin' ]
  - [ apt-get, update ]
  - [ apt-get, install, -y, 'kubelet=1.29.15-1.1', 'kubectl=1.29.15-1.1', 'kubeadm=1.29.15-1.1' ]
  - [ apt-mark, hold, kubelet, kubectl, kubeadm ]
  # Configure containerd
  - [ mkdir, -p, /etc/containerd ]
  - [ sh, -c, 'containerd config default > /etc/containerd/config.toml' ]
  - [ sh, -c, 'sed -i "s/SystemdCgroup = false/SystemdCgroup = true/" /etc/containerd/config.toml' ]
  - [ systemctl, daemon-reload ]
  - [ systemctl, enable, --now, containerd ]

users:
- name: debian
  gecos: Debian User
  sudo: ALL=(ALL) NOPASSWD:ALL
  shell: /bin/bash
  lock_passwd: true
- name: root
  lock_passwd: true

locale: en_US.UTF-8

timezone: UTC

ssh_deletekeys: 1

package_upgrade: true

ssh_pwauth: true

manage_etc_hosts: true

fqdn: #HOSTNAME#.kube.demo

hostname: #HOSTNAME#

power_state:
  mode: reboot
  timeout: 30
  condition: true
Configure your local routing
You need to add a route to your local machine to access the internal network of Virtualbox.
~$ sudo ip route add 192.168.4.0/27 via 192.168.4.30 dev vboxnet0
~$ sudo ip route add 192.168.4.32/27 via 192.168.4.62 dev vboxnet0
Access the BusyBox
We need to get the BusyBox IP to access it via ssh
~$ vboxmanage guestproperty get busybox "/VirtualBox/GuestInfo/Net/0/V4/IP"
Expected output:
Value: 192.168.4.57
Use the returned value to access.
~$ ssh debian@192.168.4.57
Expected output:
Linux busybox 6.1.0-42-amd64 #1 SMP PREEMPT_DYNAMIC Debian 6.1.159-1 (2025-12-30) x86_64

The programs included with the Debian GNU/Linux system are free software;
the exact distribution terms for each program are described in the
individual files in /usr/share/doc/*/copyright.

Debian GNU/Linux comes with ABSOLUTELY NO WARRANTY, to the extent
permitted by applicable law.
Configure the cluster
For more information about best practices certificates see here : https://kubernetes.io/docs/setup/best-practices/certificates/
-
Create the requests certificates for the kube-mast nodes
debian@busybox:~/certificates$ CN=kube-apiserver-etcd-client SAN= \
    openssl req -newkey rsa:2048 -nodes \
      -keyout kube-apiserver-etcd-client-key.pem \
      -config config.conf \
      -out kube-apiserver-etcd-client-cert.csr
Expected output:
Generating a RSA private key .......+++++ .................+++++ writing new private key to 'kube-apiserver-etcd-client-key.pem' ----- -
Sign the client certificate using your own etcd CA
debian@busybox:~/certificates$ CN=kube-apiserver-etcd-client SAN= \
  openssl x509 -req \
      -extfile config.conf \
      -extensions user \
      -in kube-apiserver-etcd-client-cert.csr \
      -CA ca-etcd-cert.pem \
      -CAkey ca-etcd-key.pem \
      -CAcreateserial \
      -out kube-apiserver-etcd-client-cert.pem \
      -days 3650 \
      -sha256
Expected output:
Signature ok subject=C = BR, ST = SP, L = Campinas, O = "Kubernetes, Labs", OU = Labs, CN = kube-apiserver-etcd-client Getting CA Private Key -
Verify the signatures
debian@busybox:~/certificates$ openssl verify -CAfile ca-etcd-chain-cert.pem kube-apiserver-etcd-client-cert.pemExpected output:
kube-apiserver-etcd-client-cert.pem: OK -
Copy certificates to
kube-mast01debian@busybox:~/certificates$ scp ca-etcd-chain-cert.pem kube-apiserver-etcd-client-*.pem kube-mast01:~/.Expected output:
ca-etcd-chain-cert.pem                         100% 1200     1.2MB/s   00:00
kube-apiserver-etcd-client-cert.pem            100% 1623     1.2MB/s   00:00
kube-apiserver-etcd-client-key.pem             100% 1708     1.8MB/s   00:00
kubeadm-config
At this point, we need to set up our K8S cluster with its initial configuration..
The SAN, Plane Control EndPoint, POD Subnet and etcd servers information is required.
- The Control Plane EndPoint address was defined in the HAProxy Cluster (192.168.4.20) (here).
- The SAN address will be the same as the Control Plane EndPoint.
- The CIDR of the PODs will be the range recommended by the Flannel configuration (search for
net-conf.jsonhere). - For the etcd servers, you should pass the etcd information in the kubeadm config file.
Based on the above information, we will have a kubeadm-config-external-etcd.yaml that looks like this:
apiVersion: kubeadm.k8s.io/v1beta3
kind: ClusterConfiguration
kubernetesVersion: v1.29.15
apiServer:
  certSANs:
  - "192.168.4.20"
controlPlaneEndpoint: "192.168.4.20:6443"
networking:
  podSubnet: 10.244.0.0/16
etcd:
  external:
    endpoints:
    - https://etcd-node01.kube.demo:2379
    - https://etcd-node02.kube.demo:2379
    - https://etcd-node03.kube.demo:2379
    caFile: /etc/kubernetes/pki/etcd/ca.crt
    certFile: /etc/kubernetes/pki/apiserver-etcd-client.crt
    keyFile: /etc/kubernetes/pki/apiserver-etcd-client.key
---
kind: KubeletConfiguration
apiVersion: kubelet.config.k8s.io/v1beta1
cgroupDriver: systemd
kubeadm init
The kubeadm tool is good if you need:
- A simple way for you to try out Kubernetes, possibly for the first time.
- A way for existing users to automate setting up a cluster and test their application.
- A building block in other ecosystem and/or installer tools with a larger scope.
Reference: https://kubernetes.io/docs/setup/production-environment/tools/kubeadm/create-cluster-kubeadm/
Setting up a cluster with external etcd nodes is similar to the procedure used for stacked etcd, with the exception that you should set up etcd first, and you should pass the etcd information in the kubeadm config file.
-
Move certificates to access
etcdnodesdebian@busybox:~$ ssh kube-mast01 debian@kube-mast01:~$ sudo mkdir -p /etc/kubernetes/pki/etcd debian@kube-mast01:~$ sudo mv kube-apiserver-etcd-client-cert.pem /etc/kubernetes/pki/apiserver-etcd-client.crt debian@kube-mast01:~$ sudo mv kube-apiserver-etcd-client-key.pem /etc/kubernetes/pki/apiserver-etcd-client.key debian@kube-mast01:~$ sudo mv ca-etcd-chain-cert.pem /etc/kubernetes/pki/etcd/ca.crt debian@kube-mast01:~$ sudo chown -R root:root /etc/kubernetes/pki -
Run the following commands to init the master node:
debian@busybox:~$ ssh kube-mast01

debian@kube-mast01:~$ curl --progress-bar https://raw.githubusercontent.com/mvallim/kubernetes-under-the-hood/master/master/kubeadm-config-external-etcd.yaml -o kubeadm-config-external-etcd.yaml

debian@kube-mast01:~$ sudo kubeadm init --config=kubeadm-config-external-etcd.yaml --upload-certs
Expected output:
[init] Using Kubernetes version: v1.20.15 [preflight] Running pre-flight checks [preflight] Pulling images required for setting up a Kubernetes cluster [preflight] This might take a minute or two, depending on the speed of your internet connection [preflight] You can also perform this action in beforehand using 'kubeadm config images pull' [certs] Using certificateDir folder "/etc/kubernetes/pki" [certs] Generating "ca" certificate and key [certs] Generating "apiserver" certificate and key [certs] apiserver serving cert is signed for DNS names [kube-mast01 kubernetes kubernetes.default kubernetes.default.svc kubernetes.default.svc.cluster.local] and IPs [10.96.0.1 192.168.1.196 192.168.4.20] [certs] Generating "apiserver-kubelet-client" certificate and key [certs] Generating "front-proxy-ca" certificate and key [certs] Generating "front-proxy-client" certificate and key [certs] External etcd mode: Skipping etcd/ca certificate authority generation [certs] External etcd mode: Skipping etcd/server certificate generation [certs] External etcd mode: Skipping etcd/peer certificate generation [certs] External etcd mode: Skipping etcd/healthcheck-client certificate generation [certs] External etcd mode: Skipping apiserver-etcd-client certificate generation [certs] Generating "sa" key and public key [kubeconfig] Using kubeconfig folder "/etc/kubernetes" [kubeconfig] Writing "admin.conf" kubeconfig file [kubeconfig] Writing "kubelet.conf" kubeconfig file [kubeconfig] Writing "controller-manager.conf" kubeconfig file [kubeconfig] Writing "scheduler.conf" kubeconfig file [kubelet-start] Writing kubelet environment file with flags to file "/var/lib/kubelet/kubeadm-flags.env" [kubelet-start] Writing kubelet configuration to file "/var/lib/kubelet/config.yaml" [kubelet-start] Starting the kubelet [control-plane] Using manifest folder "/etc/kubernetes/manifests" [control-plane] Creating static Pod manifest for "kube-apiserver" [control-plane] Creating static Pod manifest for "kube-controller-manager" [control-plane] Creating static Pod manifest for "kube-scheduler" [wait-control-plane] Waiting for the kubelet to boot up the control plane as static Pods from directory "/etc/kubernetes/manifests". This can take up to 4m0s [apiclient] All control plane components are healthy after 18.572534 seconds [upload-config] Storing the configuration used in ConfigMap "kubeadm-config" in the "kube-system" Namespace [kubelet] Creating a ConfigMap "kubelet-config-1.20" in namespace kube-system with the configuration for the kubelets in the cluster [upload-certs] Storing the certificates in Secret "kubeadm-certs" in the "kube-system" Namespace [upload-certs] Using certificate key: e5b2b65631c7bed6ba5ae930801b03bf4cda6c2a347bcf9ab642c640125d6741 [mark-control-plane] Marking the node kube-mast01 as control-plane by adding the labels "node-role.kubernetes.io/master=''" and "node-role.kubernetes.io/control-plane='' (deprecated)" [mark-control-plane] Marking the node kube-mast01 as control-plane by adding the taints [node-role.kubernetes.io/master:NoSchedule] [bootstrap-token] Using token: 3s2ymz.c938jlvu9kxlkn1k [bootstrap-token] Configuring bootstrap tokens, cluster-info ConfigMap, RBAC Roles [bootstrap-token] configured RBAC rules to allow Node Bootstrap tokens to get nodes [bootstrap-token] configured RBAC rules to allow Node Bootstrap tokens to post CSRs in order for nodes to get long term certificate credentials [bootstrap-token] configured RBAC rules to allow the csrapprover controller automatically approve CSRs from a Node Bootstrap Token [bootstrap-token] configured RBAC rules to allow certificate rotation for all node client certificates in the cluster [bootstrap-token] Creating the "cluster-info" ConfigMap in the "kube-public" namespace [kubelet-finalize] Updating "/etc/kubernetes/kubelet.conf" to point to a rotatable kubelet client certificate and key [addons] Applied essential addon: CoreDNS [addons] Applied essential addon: kube-proxy Your Kubernetes control-plane has initialized successfully! To start using your cluster, you need to run the following as a regular user: mkdir -p $HOME/.kube sudo cp -i /etc/kubernetes/admin.conf $HOME/.kube/config sudo chown $(id -u):$(id -g) $HOME/.kube/config Alternatively, if you are the root user, you can run: export KUBECONFIG=/etc/kubernetes/admin.conf You should now deploy a pod network to the cluster. Run "kubectl apply -f [podnetwork].yaml" with one of the options listed at: https://kubernetes.io/docs/concepts/cluster-administration/addons/ You can now join any number of the control-plane node running the following command on each as root: kubeadm join 192.168.4.20:6443 --token 3s2ymz.c938jlvu9kxlkn1k \ --discovery-token-ca-cert-hash sha256:0061e79139ca67dbd24df18ee6583c5a219a12a48f69b1130ee7f9f4c6278239 \ --control-plane --certificate-key e5b2b65631c7bed6ba5ae930801b03bf4cda6c2a347bcf9ab642c640125d6741 Please note that the certificate-key gives access to cluster sensitive data, keep it secret! As a safeguard, uploaded-certs will be deleted in two hours; If necessary, you can use "kubeadm init phase upload-certs --upload-certs" to reload certs afterward. Then you can join any number of worker nodes by running the following on each as root: kubeadm join 192.168.4.20:6443 --token 3s2ymz.c938jlvu9kxlkn1k \ --discovery-token-ca-cert-hash sha256:0061e79139ca67dbd24df18ee6583c5a219a12a48f69b1130ee7f9f4c6278239 -
Finish configuring the cluster and query the state of nodes and pods
debian@kube-mast01:~$ mkdir -p $HOME/.kube

debian@kube-mast01:~$ sudo cp -i /etc/kubernetes/admin.conf $HOME/.kube/config

debian@kube-mast01:~$ sudo chown $(id -u):$(id -g) $HOME/.kube/config

debian@kube-mast01:~$ kubectl get nodes -o wide

debian@kube-mast01:~$ kubectl get pods -o wide --all-namespaces
Expected output:
NAME          STATUS   ROLES           AGE     VERSION    INTERNAL-IP     EXTERNAL-IP   OS-IMAGE                         KERNEL-VERSION   CONTAINER-RUNTIME
kube-mast01   Ready    control-plane   5h56m   v1.29.15   192.168.1.99    <none>        Debian GNU/Linux 12 (bookworm)   6.1.0-42-amd64   containerd://2.2.1
NAMESPACE NAME READY STATUS RESTARTS AGE IP NODE NOMINATED NODE READINESS GATES kube-system coredns-74ff55c5b-gnf5j 0/1 ContainerCreating 0 115s <none> kube-mast01 <none> <none> kube-system coredns-74ff55c5b-kdqzd 0/1 ContainerCreating 0 115s <none> kube-mast01 <none> <none> kube-system kube-apiserver-kube-mast01 1/1 Running 0 116s 192.168.1.196 kube-mast01 <none> <none> kube-system kube-controller-manager-kube-mast01 1/1 Running 0 116s 192.168.1.196 kube-mast01 <none> <none> kube-system kube-proxy-8nmzt 1/1 Running 0 116s 192.168.1.196 kube-mast01 <none> <none> kube-system kube-scheduler-kube-mast01 1/1 Running 0 116s 192.168.1.196 kube-mast01 <none> <none>
If you look at the status on the
kube-mast01node, it says it is NotReady and thecorednspods are in the Pending state. This is because, up to this point, we do not have a network component configured in our K8S cluster. Remember, as explained before, Flannel will be used for this matter.
Deploy flannel
-
Run the following commands to init the flannel network component:
debian@kube-mast01:~$ kubectl apply -f https://raw.githubusercontent.com/flannel-io/flannel/v0.28.0/Documentation/kube-flannel.ymlExpected output:
namespace/kube-flannel created clusterrole.rbac.authorization.k8s.io/flannel created clusterrolebinding.rbac.authorization.k8s.io/flannel created serviceaccount/flannel created configmap/kube-flannel-cfg created daemonset.apps/kube-flannel-ds created -
Query the state of the nodes and pods after flannel is deployed:
debian@kube-mast01:~$ kubectl get nodes -o wide

debian@kube-mast01:~$ kubectl get pods -o wide --all-namespaces
Expected output:
NAME          STATUS   ROLES           AGE     VERSION    INTERNAL-IP     EXTERNAL-IP   OS-IMAGE                         KERNEL-VERSION   CONTAINER-RUNTIME
kube-mast01   Ready    control-plane   5h56m   v1.29.15   192.168.1.99    <none>        Debian GNU/Linux 12 (bookworm)   6.1.0-42-amd64   containerd://2.2.1
NAMESPACE NAME READY STATUS RESTARTS AGE IP NODE NOMINATED NODE READINESS GATES kube-flannel kube-flannel-ds-xjbnd 1/1 Running 0 68s 192.168.1.55 kube-mast01 <none> <none> kube-system coredns-76f75df574-g4nq4 1/1 Running 0 6m21s 10.244.0.3 kube-mast01 <none> <none> kube-system coredns-76f75df574-qtdnw 1/1 Running 0 6m21s 10.244.0.2 kube-mast01 <none> <none> kube-system etcd-kube-mast01 1/1 Running 5 6m34s 192.168.1.55 kube-mast01 <none> <none> kube-system kube-apiserver-kube-mast01 1/1 Running 0 6m33s 192.168.1.55 kube-mast01 <none> <none> kube-system kube-controller-manager-kube-mast01 1/1 Running 0 6m34s 192.168.1.55 kube-mast01 <none> <none> kube-system kube-proxy-xqfgl 1/1 Running 0 6m22s 192.168.1.55 kube-mast01 <none> <none> kube-system kube-scheduler-kube-mast01 1/1 Running 3 6m34s 192.168.1.55 kube-mast01 <none> <none>
If you look at the status on the
kube-mast01node, it is now Ready and coredns is Running. Also, now there is a pod namedkube-flannel-ds-xjbnd.
Join the Master Replicas
Now we need to join the other nodes to our K8S cluster. For this, we need the certificates that were generated in the previous steps.
Print the Certificate Key
-
Run the following commands to copy certificates to the master replicas:
debian@kube-mast01:~$ sudo kubeadm init phase upload-certs --upload-certs --config kubeadm-config-external-etcd.yamlExpected output:
[upload-certs] Storing the certificates in Secret "kubeadm-certs" in the "kube-system" Namespace
[upload-certs] Using certificate key:
8f82af9d347a92b7a3574411ca5e3a602d998e9693788563a39425170f1f8f7b
Now we’ll use the certificate key
8f82af9d347a92b7a3574411ca5e3a602d998e9693788563a39425170f1f8f7b
Print the Join Command
-
Run the following command to print the join command. This will be used to join the other master replicas to the cluster:
debian@kube-mast01:~$ sudo kubeadm token create --print-join-commandExpected output:
kubeadm join 192.168.4.20:6443 --token gdv833.5y5sqvdyzhmkglgm --discovery-token-ca-cert-hash sha256:50a12d2dc866be63c2aed97f38b14fd9729ada935732daedecdc6187f6227568
Join the second Kube Master
-
Run the following commands to join the second master replica in the cluster using the join command printed in the previous section:
debian@busybox:~$ ssh kube-mast02

debian@kube-mast02:~$ sudo kubeadm join 192.168.4.20:6443 \
 --token gdv833.5y5sqvdyzhmkglgm \
 --discovery-token-ca-cert-hash sha256:50a12d2dc866be63c2aed97f38b14fd9729ada935732daedecdc6187f6227568 \
 --certificate-key 8f82af9d347a92b7a3574411ca5e3a602d998e9693788563a39425170f1f8f7b \
 --control-plane
Join third Kube Master
-
Run the following commands to join the third master replica to the cluster using the join command printed in the previous section:
debian@busybox:~$ ssh kube-mast03

debian@kube-mast03:~$ sudo kubeadm join 192.168.4.20:6443 \
 --token gdv833.5y5sqvdyzhmkglgm \
 --discovery-token-ca-cert-hash sha256:50a12d2dc866be63c2aed97f38b14fd9729ada935732daedecdc6187f6227568 \
 --certificate-key 8f82af9d347a92b7a3574411ca5e3a602d998e9693788563a39425170f1f8f7b \
 --control-plane
Check the K8S Cluster stats
-
Query the state of nodes and pods
debian@busybox:~$ ssh kube-mast01

debian@kube-mast01:~$ kubectl get nodes -o wide

debian@kube-mast01:~$ kubectl get pods -o wide --all-namespaces
Expected output:
NAME          STATUS   ROLES           AGE   VERSION    INTERNAL-IP     EXTERNAL-IP   OS-IMAGE                         KERNEL-VERSION   CONTAINER-RUNTIME
kube-mast01   Ready    control-plane   25m   v1.29.15   192.168.1.55    <none>        Debian GNU/Linux 12 (bookworm)   6.1.0-42-amd64   containerd://2.2.1
kube-mast02   Ready    control-plane   15m   v1.29.15   192.168.1.183   <none>        Debian GNU/Linux 12 (bookworm)   6.1.0-42-amd64   containerd://2.2.1
kube-mast03   Ready    control-plane   14m   v1.29.15   192.168.1.218   <none>        Debian GNU/Linux 12 (bookworm)   6.1.0-42-amd64   containerd://2.2.1
All master nodes are expected to be in the Ready state:
NAMESPACE      NAME                                  READY   STATUS    RESTARTS      AGE   IP              NODE          NOMINATED NODE   READINESS GATES
kube-flannel   kube-flannel-ds-6kg8w                 1/1     Running   0             14m   192.168.1.218   kube-mast03   <none>           <none>
kube-flannel   kube-flannel-ds-7zvlm                 1/1     Running   0             15m   192.168.1.183   kube-mast02   <none>           <none>
kube-flannel   kube-flannel-ds-xjbnd                 1/1     Running   0             20m   192.168.1.55    kube-mast01   <none>           <none>
kube-system    coredns-76f75df574-g4nq4              1/1     Running   0             25m   10.244.0.3      kube-mast01   <none>           <none>
kube-system    coredns-76f75df574-qtdnw              1/1     Running   0             25m   10.244.0.2      kube-mast01   <none>           <none>
kube-system    etcd-kube-mast01                      1/1     Running   5             25m   192.168.1.55    kube-mast01   <none>           <none>
kube-system    etcd-kube-mast02                      1/1     Running   0             15m   192.168.1.183   kube-mast02   <none>           <none>
kube-system    etcd-kube-mast03                      1/1     Running   0             14m   192.168.1.218   kube-mast03   <none>           <none>
kube-system    kube-apiserver-kube-mast01            1/1     Running   0             25m   192.168.1.55    kube-mast01   <none>           <none>
kube-system    kube-apiserver-kube-mast02            1/1     Running   1 (14m ago)   15m   192.168.1.183   kube-mast02   <none>           <none>
kube-system    kube-apiserver-kube-mast03            1/1     Running   1 (13m ago)   14m   192.168.1.218   kube-mast03   <none>           <none>
kube-system    kube-controller-manager-kube-mast01   1/1     Running   0             25m   192.168.1.55    kube-mast01   <none>           <none>
kube-system    kube-controller-manager-kube-mast02   1/1     Running   0             15m   192.168.1.183   kube-mast02   <none>           <none>
kube-system    kube-controller-manager-kube-mast03   1/1     Running   0             14m   192.168.1.218   kube-mast03   <none>           <none>
kube-system    kube-proxy-hkg2f                      1/1     Running   0             15m   192.168.1.183   kube-mast02   <none>           <none>
kube-system    kube-proxy-r7k9x                      1/1     Running   0             14m   192.168.1.218   kube-mast03   <none>           <none>
kube-system    kube-proxy-xqfgl                      1/1     Running   0             25m   192.168.1.55    kube-mast01   <none>           <none>
kube-system    kube-scheduler-kube-mast01            1/1     Running   3             25m   192.168.1.55    kube-mast01   <none>           <none>
kube-system    kube-scheduler-kube-mast02            1/1     Running   0             15m   192.168.1.183   kube-mast02   <none>           <none>
kube-system    kube-scheduler-kube-mast03            1/1     Running   0             14m   192.168.1.218   kube-mast03   <none>           <none>
All master pods are Running
Check the HAProxy Cluster stats
Open your browser at http://192.168.4.20:32700
User: admin
Password: admin
It will show:
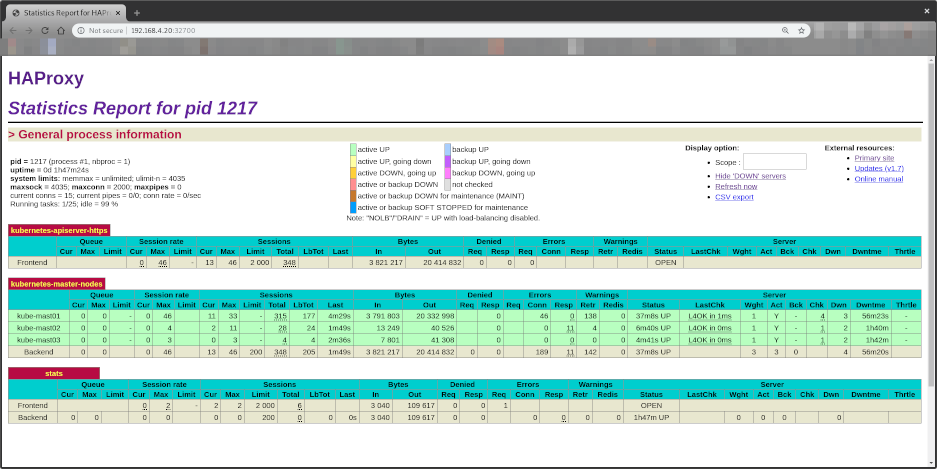
Notice all Control Plane EndPoints are now UP
- kube-mast01:6443
- kube-mast02:6443
- kube-mast03:6443