How to setup the Workers using kubeadm bootstrap
A node is a worker machine in Kubernetes, previously known as a minion. A node may be a VM or physical machine, depending on the cluster. Each node contains the services necessary to run pods and is managed by the master components. The services on a node include the container runtime, kubelet and kube-proxy.
Overview
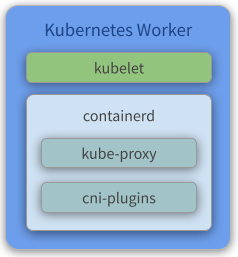
Components
- Kubelet - Gets configuration of a pod from the API Server and ensures that the described containers are up and running.
- containerd - Takes care of downloading the images and starting the containers.
- Kube Proxy - Acts as a network proxy and a load balancer for a service on a single worker node. It takes care of the network routing for TCP and UDP packets.
- Flannel - A layer 3 network fabric designed for Kubernetes. Check our previous topic about flannel for more information.
- More info about Flannel: https://github.com/coreos/flannel
Create the VMs
To initialize and configure our instances using cloud-init, we’ll use the configuration files versioned at the data directory from our repository.
Notice we also make use of our create-image.sh helper script, passing some files from inside the data/kube/ directory as parameters.
-
Create the Workers
~/kubernetes-under-the-hood$ for instance in kube-node01 kube-node02 kube-node03; do
    ./create-image.sh \
        -k ~/.ssh/id_rsa.pub \
        -u kube/user-data \
        -n kube-node/network-config \
        -i kube-node/post-config-interfaces \
        -r kube-node/post-config-resources \
        -o ${instance} \
        -l debian \
        -b debian-base-image
done
Expected output:
Total translation table size: 0
Total rockridge attributes bytes: 417
Total directory bytes: 0
Path table size(bytes): 10
Max brk space used 0
186 extents written (0 MB)
0%...10%...20%...30%...40%...50%...60%...70%...80%...90%...100%
Machine has been successfully cloned as "kube-node01"
Waiting for VM "kube-node01" to power on...
VM "kube-node01" has been successfully started.
Total translation table size: 0
Total rockridge attributes bytes: 417
Total directory bytes: 0
Path table size(bytes): 10
Max brk space used 0
186 extents written (0 MB)
0%...10%...20%...30%...40%...50%...60%...70%...80%...90%...100%
Machine has been successfully cloned as "kube-node02"
Waiting for VM "kube-node02" to power on...
VM "kube-node02" has been successfully started.
Total translation table size: 0
Total rockridge attributes bytes: 417
Total directory bytes: 0
Path table size(bytes): 10
Max brk space used 0
186 extents written (0 MB)
0%...10%...20%...30%...40%...50%...60%...70%...80%...90%...100%
Machine has been successfully cloned as "kube-node03"
Waiting for VM "kube-node03" to power on...
VM "kube-node03" has been successfully started.
Parameters:
-kis used to copy the public key from your host to the newly created VM.-uis used to specify the user-data file that will be passed as a parameter to the command that creates the cloud-init ISO file we mentioned before (check the source code of the script for a better understanding of how it’s used). Default is/data/user-data.-mis used to specify the meta-data file that will be passed as a parameter to the command that creates the cloud-init ISO file we mentioned before (check the source code of the script for a better understanding of how it’s used). Default is/data/meta-data.-nis used to pass a configuration file that will be used by cloud-init to configure the network for the instance.-iis used to pass a configuration file that our script will use to modify the network interface managed by VirtualBox that is attached to the instance that will be created from this image.-ris used to pass a configuration file that our script will use to configure the number of processors and amount of memory that is allocated to our instance by VirtualBox.-ois used to pass the hostname that will be assigned to our instance. This will also be the name used by VirtualBox to reference our instance.-lis used to inform which Linux distribution (debian or ubuntu) configuration files we want to use (notice this is used to specify which folder under data is referenced). Default isdebian.-bis used to specify which base image should be used. This is the image name that was created on VirtualBox when we executed the installation steps from our linux image.-sis used to pass a configuration file that our script will use to configure virtual disks on VirtualBox. You’ll notice this is used only on the Gluster configuration step.-awhether or not our instance should be initialized after it’s created. Default istrue.
Configure your local routing
You need to add a route to your local machine to access the internal network of Virtualbox.
~$ sudo ip route add 192.168.4.0/27 via 192.168.4.30 dev vboxnet0
~$ sudo ip route add 192.168.4.32/27 via 192.168.4.62 dev vboxnet0
Access the BusyBox
We need to get the BusyBox IP to access it via ssh:
~$ vboxmanage guestproperty get busybox "/VirtualBox/GuestInfo/Net/0/V4/IP"
Expected output:
Value: 192.168.4.57
Use the returned value to access the BusyBox:
~$ ssh debian@192.168.4.57
Expected output:
Linux busybox 6.1.0-42-amd64 #1 SMP PREEMPT_DYNAMIC Debian 6.1.159-1 (2025-12-30) x86_64

The programs included with the Debian GNU/Linux system are free software;
the exact distribution terms for each program are described in the
individual files in /usr/share/doc/*/copyright.

Debian GNU/Linux comes with ABSOLUTELY NO WARRANTY, to the extent
permitted by applicable law.
Understading the user-data file
The cloud-init kube-master configuration file can be found here. This configures and install docker and kubernetes binaries (kubeadm, kubectl, kubelet).
Below you can find the same file commented for easier understanding:
#cloud-config
write_files:

# CA ssh pub certificate
- path: /etc/ssh/sshd_config
  permissions: '0644'
  content: |
    TrustedUserCAKeys /etc/ssh/ca.pub
  append: true

# CA ssh pub certificate
- path: /etc/ssh/ca.pub
  permissions: '0644'
  encoding: b64
  content: |
    c3NoLWVkMjU1MTkgQUFBQUMzTnphQzFsWkRJMU5URTVBQUFBSUZWTW1rTnRuRmZDaXRjcFFlWnFR
    dVZQK0NKV1JtWGp3aGlRakoyalJxaS8gY2FAa3ViZS5kZW1vCg==

  # The bridge-netfilter code enables the following functionality:
  #  - {Ip,Ip6,Arp}tables can filter bridged IPv4/IPv6/ARP packets, even when
  # encapsulated in an 802.1Q VLAN or PPPoE header. This enables the functionality
  # of a stateful transparent firewall.
  #  - All filtering, logging and NAT features of the 3 tools can therefore be used
  # on bridged frames.
  #  - Combined with ebtables, the bridge-nf code therefore makes Linux a very
  # powerful transparent firewall.
  #  - This enables, f.e., the creation of a transparent masquerading machine (i.e.
  # all local hosts think they are directly connected to the Internet).
  #
  # The OverlayFS is a union mount filesystem implementation for Linux. It combines
  # multiple different underlying mount points into one, resulting in single
  # directory structure that contains underlying files and sub-directories from all
  # sources.
- path: /etc/modules-load.d/containerd.conf
  permissions: '0644'
  content: |
    overlay
    br_netfilter

  # Besides providing the NetworkPlugin interface to configure and clean up pod networking,
  # the plugin may also need specific support for kube-proxy. The iptables proxy obviously
  # depends on iptables, and the plugin may need to ensure that container traffic is made
  # available to iptables. For example, if the plugin connects containers to a Linux bridge,
  # the plugin must set the net/bridge/bridge-nf-call-iptables sysctl to 1 to ensure that
  # the iptables proxy functions correctly. If the plugin does not use a Linux bridge
  # (but instead something like Open vSwitch or some other mechanism) it should ensure
  # container traffic is appropriately routed for the proxy.
  #
  # For more details : https://kubernetes.io/docs/concepts/extend-kubernetes/compute-storage-net/network-plugins/#network-plugin-requirements
  #
  # As a requirement for your Linux Node’s iptables to correctly see bridged traffic
- path: /etc/sysctl.d/10-kubernetes.conf
  permissions: '0644'
  content: |
    net.ipv4.ip_forward=1
    net.bridge.bridge-nf-call-iptables=1
    net.bridge.bridge-nf-call-arptables=1

- path: /etc/crictl.yaml
  permissions: '0644'
  content: |
    runtime-endpoint: unix:///var/run/containerd/containerd.sock
    timeout: 0
    debug: false

- path: /etc/cni/net.d/net-conf.json
  permission: '0644'
  content: |
    {
      "cniVersion": "0.3.1"
      "Network": "10.244.0.0/16",
      "Backend": {
        "Type": "vxlan"
      }
    }

- path: /etc/cni/net.d/loopback-conf.json
  permission: '0644'
  content: |
    {
      "cniVersion": "0.3.1",
      "name": "lo",
      "type": "loopback"
    }

- path: /usr/local/lib/systemd/system/containerd.service
  permissions: '0644'
  content: |
    [Unit]
    Description=containerd container runtime
    Documentation=https://containerd.io
    After=network.target dbus.service

    [Service]
    ExecStartPre=-/sbin/modprobe overlay
    ExecStart=/usr/local/bin/containerd

    Type=notify
    Delegate=yes
    KillMode=process
    Restart=always
    RestartSec=5

    # Having non-zero Limit*s causes performance problems due to accounting overhead
    # in the kernel. We recommend using cgroups to do container-local accounting.
    LimitNPROC=infinity
    LimitCORE=infinity

    # Comment TasksMax if your systemd version does not supports it.
    # Only systemd 226 and above support this version.
    TasksMax=infinity
    OOMScoreAdjust=-999

    [Install]
    WantedBy=multi-user.target

apt:
  sources_list: |
    deb http://deb.debian.org/debian/ $RELEASE main contrib non-free non-free-firmware
    deb-src http://deb.debian.org/debian/ $RELEASE main contrib non-free non-free-firmware

    deb http://deb.debian.org/debian/ $RELEASE-updates main contrib non-free non-free-firmware
    deb-src http://deb.debian.org/debian/ $RELEASE-updates main contrib non-free non-free-firmware

    deb http://deb.debian.org/debian-security $RELEASE-security main
    deb-src http://deb.debian.org/debian-security $RELEASE-security main

  sources:
    kubernetes.list:
      source: deb [signed-by=/etc/apt/keyrings/kubernetes-apt-keyring.gpg] https://pkgs.k8s.io/core:/stable:/v1.29/deb/ /

  conf: |
    APT {
      Get {
        Assume-Yes "true";
        Fix-Broken "true";
      };
    };

packages:
  - apt-transport-https
  - ca-certificates
  - gnupg2
  - software-properties-common
  - bridge-utils
  - curl
  - gnupg

runcmd:
  - [ modprobe, overlay]
  - [ modprobe, br_netfilter ]
  - [ sysctl, --system ]
  - [ sh, -c, 'curl -fsSL https://pkgs.k8s.io/core:/stable:/v1.29/deb/Release.key | sudo gpg --dearmor -o /etc/apt/keyrings/kubernetes-apt-keyring.gpg' ]
  - [ sh, -c, 'curl -fsSL https://github.com/containerd/containerd/releases/download/v2.2.1/containerd-2.2.1-linux-amd64.tar.gz | tar -xz -C /usr/local' ]
  - [ sh, -c, 'curl -fsSL https://github.com/opencontainers/runc/releases/download/v1.4.0/runc.amd64 -o /usr/local/sbin/runc && chmod 755 /usr/local/sbin/runc' ]
  - [ sh, -c, 'curl -fsSL https://github.com/containernetworking/plugins/releases/download/v1.9.0/cni-plugins-linux-amd64-v1.9.0.tgz | tar -xz -C /opt/cni/bin' ]
  - [ apt-get, update ]
  - [ apt-get, install, -y, 'kubelet=1.29.15-1.1', 'kubectl=1.29.15-1.1', 'kubeadm=1.29.15-1.1' ]
  - [ apt-mark, hold, kubelet, kubectl, kubeadm ]
  # Configure containerd
  - [ mkdir, -p, /etc/containerd ]
  - [ sh, -c, 'containerd config default > /etc/containerd/config.toml' ]
  - [ sh, -c, 'sed -i "s/SystemdCgroup = false/SystemdCgroup = true/" /etc/containerd/config.toml' ]
  - [ systemctl, daemon-reload ]
  - [ systemctl, enable, --now, containerd ]

users:
- name: debian
  gecos: Debian User
  sudo: ALL=(ALL) NOPASSWD:ALL
  shell: /bin/bash
  lock_passwd: true
- name: root
  lock_passwd: true

locale: en_US.UTF-8

timezone: UTC

ssh_deletekeys: 1

package_upgrade: true

ssh_pwauth: true

manage_etc_hosts: true

fqdn: #HOSTNAME#.kube.demo

hostname: #HOSTNAME#

power_state:
  mode: reboot
  timeout: 30
  condition: true
Configure the cluster
Print the Join Command
-
Run the following commands to print the
joincommand master replicas on cluster:debian@busybox:~$ ssh kube-mast01 debian@kube-mast01:~$ sudo kubeadm token create --print-join-commandExpected output:
kubeadm join 192.168.4.20:6443 --token bgrbbs.zk2oo7feoh4n76ol --discovery-token-ca-cert-hash sha256:8bd014db0451542d6ddd479fa7bf7fd6cfc5d0090a096bb89ae481be8e6bdd56
The command output prints the command to you join nodes on cluster. You will use this command to join the workers in the cluster.
Join the first Kube Worker
-
Run the following commands to join the first worker in the cluster using the join command printed in the previous section:
debian@busybox:~$ ssh kube-node01

debian@kube-node01:~$ sudo kubeadm join 192.168.4.20:6443 \
 --token bgrbbs.zk2oo7feoh4n76ol \
 --discovery-token-ca-cert-hash sha256:8bd014db0451542d6ddd479fa7bf7fd6cfc5d0090a096bb89ae481be8e6bdd56
Join the second Kube Worker
-
Run the following commands to join the second worker in the cluster using the join command printed in the previous section:
debian@busybox:~$ ssh kube-node02

debian@kube-node02:~$ sudo kubeadm join 192.168.4.20:6443 \
 --token bgrbbs.zk2oo7feoh4n76ol \
 --discovery-token-ca-cert-hash sha256:8bd014db0451542d6ddd479fa7bf7fd6cfc5d0090a096bb89ae481be8e6bdd56
Join the third Kube Worker
-
Run the following commands to join the third worker in the cluster using the join command printed in the previous section:
debian@busybox:~$ ssh kube-node03

debian@kube-node03:~$ sudo kubeadm join 192.168.4.20:6443 \
 --token bgrbbs.zk2oo7feoh4n76ol \
 --discovery-token-ca-cert-hash sha256:8bd014db0451542d6ddd479fa7bf7fd6cfc5d0090a096bb89ae481be8e6bdd56
Check the K8S Cluster stats
-
Query the state of nodes and pods
debian@busybox:~$ ssh kube-mast01

debian@kube-mast01:~$ kubectl get nodes -o wide

debian@kube-mast01:~$ kubectl get pods -o wide --all-namespaces
Expected output:
NAME          STATUS   ROLES           AGE   VERSION    INTERNAL-IP     EXTERNAL-IP   OS-IMAGE                         KERNEL-VERSION   CONTAINER-RUNTIME
kube-mast01   Ready    control-plane   40m   v1.29.15   192.168.1.55    <none>        Debian GNU/Linux 12 (bookworm)   6.1.0-42-amd64   containerd://2.2.1
kube-mast02   Ready    control-plane   30m   v1.29.15   192.168.1.183   <none>        Debian GNU/Linux 12 (bookworm)   6.1.0-42-amd64   containerd://2.2.1
kube-mast03   Ready    control-plane   29m   v1.29.15   192.168.1.218   <none>        Debian GNU/Linux 12 (bookworm)   6.1.0-42-amd64   containerd://2.2.1
kube-node01   Ready    <none>          47s   v1.29.15   192.168.2.139   <none>        Debian GNU/Linux 12 (bookworm)   6.1.0-42-amd64   containerd://2.2.1
kube-node02   Ready    <none>          33s   v1.29.15   192.168.2.197   <none>        Debian GNU/Linux 12 (bookworm)   6.1.0-42-amd64   containerd://2.2.1
kube-node03   Ready    <none>          23s   v1.29.15   192.168.2.195   <none>        Debian GNU/Linux 12 (bookworm)   6.1.0-42-amd64   containerd://2.2.1
All nodes are Ready
NAMESPACE      NAME                                  READY   STATUS    RESTARTS      AGE   IP              NODE          NOMINATED NODE   READINESS GATES
kube-flannel   kube-flannel-ds-6kg8w                 1/1     Running   0             30m   192.168.1.218   kube-mast03   <none>           <none>
kube-flannel   kube-flannel-ds-7zvlm                 1/1     Running   0             31m   192.168.1.183   kube-mast02   <none>           <none>
kube-flannel   kube-flannel-ds-cpf9g                 1/1     Running   0             88s   192.168.2.139   kube-node01   <none>           <none>
kube-flannel   kube-flannel-ds-tj6jg                 1/1     Running   0             64s   192.168.2.195   kube-node03   <none>           <none>
kube-flannel   kube-flannel-ds-w9dpr                 1/1     Running   0             74s   192.168.2.197   kube-node02   <none>           <none>
kube-flannel   kube-flannel-ds-xjbnd                 1/1     Running   0             36m   192.168.1.55    kube-mast01   <none>           <none>
kube-system    coredns-76f75df574-g4nq4              1/1     Running   0             41m   10.244.0.3      kube-mast01   <none>           <none>
kube-system    coredns-76f75df574-qtdnw              1/1     Running   0             41m   10.244.0.2      kube-mast01   <none>           <none>
kube-system    etcd-kube-mast01                      1/1     Running   5             41m   192.168.1.55    kube-mast01   <none>           <none>
kube-system    etcd-kube-mast02                      1/1     Running   0             31m   192.168.1.183   kube-mast02   <none>           <none>
kube-system    etcd-kube-mast03                      1/1     Running   0             30m   192.168.1.218   kube-mast03   <none>           <none>
kube-system    kube-apiserver-kube-mast01            1/1     Running   0             41m   192.168.1.55    kube-mast01   <none>           <none>
kube-system    kube-apiserver-kube-mast02            1/1     Running   1 (30m ago)   31m   192.168.1.183   kube-mast02   <none>           <none>
kube-system    kube-apiserver-kube-mast03            1/1     Running   1 (29m ago)   30m   192.168.1.218   kube-mast03   <none>           <none>
kube-system    kube-controller-manager-kube-mast01   1/1     Running   0             41m   192.168.1.55    kube-mast01   <none>           <none>
kube-system    kube-controller-manager-kube-mast02   1/1     Running   0             31m   192.168.1.183   kube-mast02   <none>           <none>
kube-system    kube-controller-manager-kube-mast03   1/1     Running   0             30m   192.168.1.218   kube-mast03   <none>           <none>
kube-system    kube-proxy-cksjd                      1/1     Running   0             74s   192.168.2.197   kube-node02   <none>           <none>
kube-system    kube-proxy-hkg2f                      1/1     Running   0             31m   192.168.1.183   kube-mast02   <none>           <none>
kube-system    kube-proxy-n7xsb                      1/1     Running   0             88s   192.168.2.139   kube-node01   <none>           <none>
kube-system    kube-proxy-r7k9x                      1/1     Running   0             30m   192.168.1.218   kube-mast03   <none>           <none>
kube-system    kube-proxy-s6gkw                      1/1     Running   0             64s   192.168.2.195   kube-node03   <none>           <none>
kube-system    kube-proxy-xqfgl                      1/1     Running   0             41m   192.168.1.55    kube-mast01   <none>           <none>
kube-system    kube-scheduler-kube-mast01            1/1     Running   3             41m   192.168.1.55    kube-mast01   <none>           <none>
kube-system    kube-scheduler-kube-mast02            1/1     Running   0             31m   192.168.1.183   kube-mast02   <none>           <none>
kube-system    kube-scheduler-kube-mast03            1/1     Running   0             30m   192.168.1.218   kube-mast03   <none>           <none>
All pods are Running